Retiring old servers is more than just unplugging a machine; it's a critical process fraught with security, compliance, and financial risks. A single misstep can lead to catastrophic data breaches, hefty regulatory fines, or missed opportunities for asset value recovery. For organizations across Metro Atlanta, from bustling data centers in Alpharetta to healthcare providers in Marietta and public-sector agencies in Sandy Springs, a robust plan is non-negotiable. An unstructured approach leaves your sensitive data exposed and your budget vulnerable to unforeseen costs.
This comprehensive server decommissioning checklist provides a 10-step, actionable framework to navigate the entire lifecycle, ensuring your organization remains secure, compliant, and efficient. We will move beyond generic advice and provide practical, step-by-step instructions for each critical phase. Following this guide will help you confidently manage your end-of-life IT assets and turn a potential liability into a structured, secure, and valuable process.
You will learn how to:
- Securely manage data through proper backup, archival, and certified sanitization methods.
- Maintain operational continuity by carefully planning service migrations and deactivating software licenses.
- Protect your network by methodically severing connections and removing system credentials.
- Ensure full compliance with industry and government regulations through meticulous documentation and audit trails.
- Handle physical assets responsibly, from inventory and transport to environmentally sound disposal or value recovery.
This guide is your definitive resource for transforming a complex task into a manageable and secure workflow. Let’s dive into the essential steps that will protect your organization from the hidden dangers of retired hardware.
1. Data Backup and Archival
Before you unplug a single cable, the absolute first step in any responsible server decommissioning checklist is to secure the data. This involves creating comprehensive, verified backups of all information residing on the server. This foundational step acts as a critical safety net, ensuring business continuity, preventing catastrophic data loss, and maintaining compliance with industry-specific data retention policies. It's the point of no return; proceeding without a successful backup is a significant organizational risk.
Why It's the First Step
Think of this as your digital insurance policy. The server's primary purpose was to store and serve data. Whether it hosted a critical application, customer records, or financial transactions, that information holds immense value. Archiving it ensures that even after the hardware is long gone, you can retrieve necessary files for audits, legal discovery, or historical analysis. For healthcare providers in Metro Atlanta, this means securing patient records to comply with HIPAA's stringent retention rules. Similarly, financial institutions must archive transaction data to meet SEC regulations.
Implementation Examples
- Enterprise Backups: Large organizations often use robust solutions like Veeam Backup & Replication or Commvault to perform full, image-level backups of the server. This captures the entire operating system, applications, settings, and data, allowing for a complete restoration if needed.
- Cloud Archival: A cost-effective and scalable approach is to move data to long-term cloud storage. Services like AWS S3 Glacier or Azure Archive Storage are designed for data that is infrequently accessed but must be retained for compliance, offering secure storage at a low cost.
Actionable Tips for a Successful Backup
- Verify, Don't Just Backup: A backup is useless if it can't be restored. Always perform a test restoration of a sample data set to a separate, isolated environment to confirm the backup's integrity.
- Encrypt Your Archives: For sensitive information like patient data or financial records, encrypt the backup data both in transit and at rest to prevent unauthorized access.
- Implement the 3-2-1 Rule: Maintain at least three copies of your data on two different media types, with one copy stored off-site. For example, one backup on a local NAS, and another in a geographically distant cloud region.
- Document Everything: Meticulously record what was backed up, where it is stored, the software used, encryption keys, and the date of the backup. This documentation is vital for future recovery efforts.
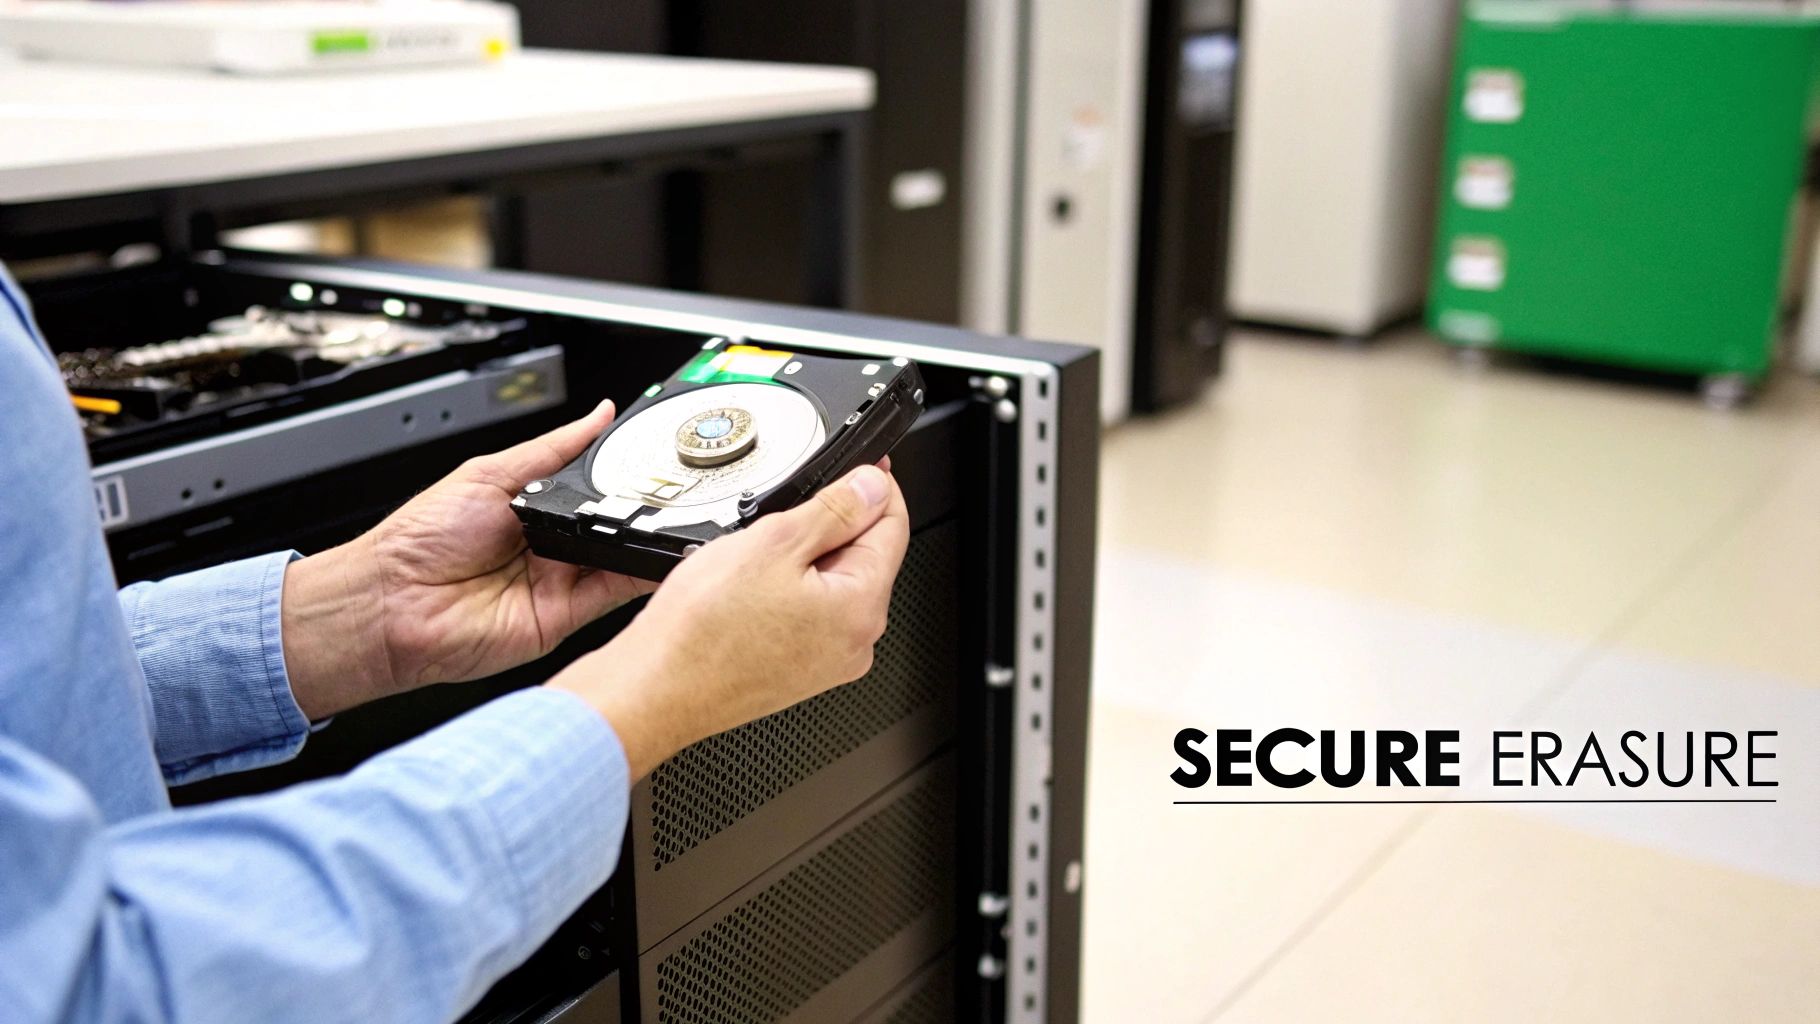
2. Data Sanitization and Secure Deletion
Once backups are secured and verified, the next critical phase in the server decommissioning checklist is to irretrievably destroy all sensitive data remaining on the server's storage media. This is not simply deleting files; it involves using certified data sanitization methods to overwrite or physically destroy the drives, ensuring that confidential information cannot be recovered. This step is non-negotiable for protecting against data breaches and maintaining compliance with privacy regulations like HIPAA and GDPR.

Why It's a Critical Step
Failing to properly sanitize data-bearing assets is a direct route to a costly data breach. Simply formatting a drive or deleting partitions leaves the underlying data recoverable with basic forensic tools. For a public sector organization in Metro Atlanta, this could mean exposing citizen data, while a local healthcare provider could face severe penalties for a HIPAA violation. Proper data sanitization provides a verifiable audit trail, proving that you have met your due diligence in protecting sensitive information. Understanding the specifics of this process is crucial; you can learn more about what data sanitization is and its methods to grasp its importance fully.
Implementation Examples
- Software-Based Erasure: Government agencies often adhere to the DoD 5220.22-M standard, which overwrites data with multiple passes. Modern data centers and enterprises typically use tools that follow the NIST SP 800-88 guidelines, which are considered the current industry standard for media sanitization.
- Physical Destruction: For highly sensitive data or when drives are at the end of their life, physical destruction is the most secure option. Companies like Iron Mountain or Shred-it offer certified on-site or off-site shredding services that reduce hard drives to tiny, unrecoverable fragments.
Actionable Tips for Secure Deletion
- Use Certified Tools: Employ software solutions that are certified to meet NIST SP 800-88 or DoD 5220.22-M standards. This ensures the erasure method is effective and defensible.
- Verify, Verify, Verify: After sanitization, use forensic tools to randomly sample drives and confirm that no data is recoverable. This verification step is key to a compliant process.
- Document the Chain of Custody: From the moment a drive is removed to its final destruction, maintain a detailed chain-of-custody log. This document tracks every person who handled the asset, preventing loss or theft.
- Obtain a Certificate of Destruction: Whether using software or physical destruction, always get a formal certificate. This document serves as legal proof of secure data sanitization for audits and compliance records.
3. Service Migration and Transition Planning
A server is more than a metal box; it's a hub for critical business operations. Before you can power it down for good, you must carefully migrate its services, applications, and workloads to their new home. This migration and transition planning phase is a complex but essential part of any server decommissioning checklist, ensuring that vital business functions continue without interruption. It involves mapping dependencies, scheduling the move, and validating performance on the new infrastructure.
Why It's a Critical Step
This step is the heart of business continuity during decommissioning. Improperly moving a core banking application or a customer-facing e-commerce platform can lead to significant downtime, lost revenue, and damaged customer trust. For a hospital in Metro Atlanta, this means flawlessly transitioning patient record systems to a new server without impacting clinical care. For a public sector agency, it means ensuring citizen services remain accessible throughout the infrastructure update. A well-executed migration is invisible to the end-user.
Implementation Examples
- Zero-Downtime Financial Migrations: Banks often use sophisticated failover strategies and load balancing to migrate core transaction systems. They shift traffic to the new infrastructure incrementally, allowing for real-time validation before fully cutting over from the old server.
- Lift-and-Shift Cloud Transitions: Many businesses use tools like AWS Application Migration Service (MGN) or Azure Site Recovery to replicate servers to the cloud with minimal disruption. This "lift-and-shift" approach is often a first step in a larger cloud modernization strategy.
Actionable Tips for a Successful Migration
- Develop a Detailed Runbook: Create a step-by-step script for each service migration. This document should outline every action, responsible party, and communication point.
- Perform a Pilot Migration: Before moving a critical application, test your process on a less important service. This helps identify unforeseen issues and refines your runbook.
- Establish Rollback Procedures: Always have a documented plan to revert to the old server if the migration fails. Test this plan beforehand. This is your most important safety net.
- Communicate with Stakeholders: Keep all affected departments informed about the migration schedule, potential impacts, and progress. Clear communication prevents confusion and manages expectations. For deeper insights, you can review some data center migration best practices.
4. License and Software Deactivation
Once data is secured, the next critical step in a server decommissioning checklist involves addressing the intangible assets tied to the hardware: software licenses and subscriptions. This process involves identifying, deactivating, and reallocating all software licenses associated with the server. Failing to manage this step properly can lead to significant financial waste from paying for unused "ghost" licenses and can expose an organization to serious legal and compliance risks for violating software licensing agreements.
Why This Step Is Crucial
Think of software licenses as digital property deeds tied to the physical server. Simply turning off the machine doesn't terminate the agreement. You are often still contractually obligated to pay for that license, or you might be in violation if that same license key is used elsewhere without proper transfer. For a Metro Atlanta software development firm, this could mean deactivating expensive developer tools like CAD or database management licenses. Properly managing this process frees up those licenses for reallocation, preventing unnecessary new purchases and ensuring the company remains compliant during a software audit.
Implementation Examples
- Enterprise Agreements: Organizations with Microsoft Enterprise Agreements or VMware vSphere licenses must use their respective management portals to formally decommission the server. This action often releases the license back into the company's pool for assignment to new hardware, optimizing the investment made in the agreement.
- Specialized Software: High-value software like Oracle Database or SAP often requires a formal deactivation process. This may involve running a specific command on the server before it's shut down or contacting the vendor's support team to have the license officially released from the hardware ID it was tied to.
- SaaS and Cloud-Connected Services: For servers running agents that connect to SaaS platforms (like monitoring tools or security agents), the device must be removed from the SaaS admin console to stop billing and prevent security alerts for an offline machine.
Actionable Tips for Successful Deactivation
- Audit Before Action: Use a software asset management (SAM) tool like Flexera or Snow Software to run a final inventory of all installed applications on the server. This ensures you don't miss any obscure or forgotten software.
- Contact Vendors Directly: When in doubt, always contact the software vendor. They can provide the exact, officially sanctioned procedure for deactivating a license and transferring it, ensuring you remain in compliance.
- Document and Confirm: Keep a detailed record of every license that was deactivated, including the software name, version, license key, and the date of deactivation. Always obtain and save written or ticket-based confirmation from the vendor.
- Check Reallocation Rights: Before moving a license to a new server, carefully review your licensing agreement. Some licenses are tied to the original hardware (OEM licenses) and cannot be legally transferred.
5. Disconnection of Network and External Connections
Once data is secured and applications are migrated, the server must be completely isolated from the network. This crucial step involves more than just unplugging the ethernet cable; it requires a systematic disconnection of all network and external connections to prevent accidental traffic, security vulnerabilities, or service disruptions. This part of the server decommissioning checklist ensures the server becomes a ghost on the network, unable to send or receive data, effectively preparing it for physical removal.
Why It's a Critical Step
Leaving a decommissioned server connected to the network is a major security risk. It can become a "zombie" asset, still discoverable and potentially accessible to malicious actors if not properly secured. For a Metro Atlanta healthcare provider, an improperly disconnected server could expose patient data to the network, violating HIPAA. Properly isolating the server ensures that all dependencies are severed, preventing unforeseen issues where other systems might still be trying to communicate with the now-defunct hardware.
Implementation Examples
- Data Center Operations: During scheduled maintenance windows, technicians follow a methodical runbook. They first disable the switch ports connected to the server, then physically unplug and label all network cables, including Ethernet, Fibre Channel (for SANs), and management connections (like iDRAC or iLO).
- Enterprise IT: Networking teams at large organizations may use discovery tools like Cisco DNA Center or SolarWinds to identify all network connections and dependencies before disconnection. This automated approach helps prevent accidental outages by mapping the server's entire network footprint.
Actionable Tips for a Clean Disconnection
- Document and Photograph: Before touching a single cable, photograph the existing connections and update your network diagrams. This documentation is invaluable for troubleshooting if a related service is inadvertently affected.
- Label Everything: Clearly label every cable with its source and destination before unplugging it. This prevents confusion and streamlines the re-cabling process for new hardware.
- Update Network Services: This is the most critical part. Immediately remove the server's DNS entries, release its static IP address in your IPAM system (like Infoblox), and delete any associated firewall rules or network ACLs.
- Verify Service Migration: Always confirm with application owners that all services have been successfully migrated and are running properly on new hardware before you disconnect the old server. This prevents an avoidable service outage.
6. Physical Inventory and Asset Documentation
Once a server is powered down and disconnected, the next critical phase in the server decommissioning checklist is a meticulous physical inventory. This step involves creating a detailed, tangible record of the hardware itself. You will document everything from make, model, and serial numbers to specific component configurations like CPU, RAM, and storage drives. This formal record is the cornerstone of effective asset management, providing the necessary data for financial depreciation, resale valuation, and compliance with IT governance policies.
Why It's a Key Step
This process bridges the gap between digital records and the physical world. For a Metro Atlanta hospital, accurate asset documentation ensures that a server containing ePHI is tracked from the data center to its final destruction, providing a clear chain of custody for HIPAA audits. For a school district, this inventory is essential for proving that equipment purchased with grant money has been disposed of according to regulations. Without this step, valuable assets can be lost, misplaced, or disposed of improperly, creating financial and security risks.
Implementation Examples
- Enterprise Asset Management: Large corporations often integrate this process into platforms like ServiceNow or use proprietary systems from Dell or HP. Technicians use scanners to update the asset's status from "active" to "decommissioned-pending-disposition" in a central database.
- SMB & Open-Source Tools: Small to medium-sized businesses can achieve the same level of control using affordable or open-source IT asset management (ITAM) software like Snipe-IT. This allows them to track assets, document specifications, and manage the entire equipment lifecycle. This is a foundational practice in what is known as asset lifecycle management.
Actionable Tips for Accurate Documentation
- Use Barcode or QR Code Scanning: Automate the process and reduce human error by using a handheld scanner or mobile app to capture asset tags and serial numbers directly into your asset management system.
- Photograph Everything: Take clear, well-lit photos of the server's exterior, interior, and any labels with serial numbers or asset tags. Document any visible damage, as this will impact its resale value.
- Record Key Component Specs: Don't just list the server model. Document the specifics: CPU model and speed, total RAM, and the number, type, and capacity of all storage drives. This information is crucial for valuation.
- Maintain a Chain of Custody: Your documentation should create an unbroken trail. Record who handled the asset, when it was moved, where it is stored, and its final destination, whether for resale, recycling, or destruction.
7. System Configuration and Access Credential Removal
After data has been secured and wiped, the next critical task in the server decommissioning checklist is to systematically purge all access credentials and sensitive configurations. This step involves more than just deleting user accounts; it's a deep cleanse of the system's identity and access control mechanisms. This process acts as a final security gateway, ensuring that even if the hardware were somehow compromised post-decommissioning, no residual credentials could be exploited to access other parts of your network.
Why It's a Crucial Step
Think of this as changing the locks after a tenant leaves. The server was once a trusted entity within your network, holding keys like API tokens, SSH keys, and service account passwords that grant access to other systems. For a financial services firm in Atlanta, failing to remove database administrator credentials could leave a backdoor into sensitive financial systems. Similarly, an orphaned API key could be used to access cloud resources, leading to data breaches or significant unauthorized spending. This step effectively severs the server's digital ties to your organization.
Implementation Examples
- Centralized Credential Management: Enterprises often use platforms like CyberArk or HashiCorp Vault to manage the lifecycle of privileged accounts. The decommissioning process would trigger an automated workflow within these systems to revoke the server's access and rotate any shared secrets it used.
- Cloud IAM Cleanup: When decommissioning a cloud-based server, the process includes deleting its associated IAM (Identity and Access Management) role or user in AWS, Azure, or GCP. This ensures the instance's permissions are fully and irrevocably terminated.
Actionable Tips for a Secure Credential Wipe
- Audit Before You Delete: Before removing anything, run an audit to identify all local user accounts, service accounts, SSH keys, and stored API tokens. Don't forget to check application configuration files for hardcoded credentials.
- Automate Where Possible: Use scripts to systematically remove users, clear bash history and log files, and scan for leftover credentials. Automation reduces the risk of human error and ensures a consistent process.
- Verify Service Migration First: Ensure that any services or applications have been successfully migrated before revoking the credentials they rely on. Pulling the plug too early can cause outages.
- Document Credential Removal: Maintain a clear audit trail documenting which credentials were removed, by whom, and when. This documentation is essential for security compliance and post-decommissioning validation.
8. Compliance Verification and Audit Trail Documentation
After the physical and digital work is done, the final, crucial step in any professional server decommissioning checklist is to formalize the process through rigorous documentation. This involves creating a comprehensive audit trail that verifies every action taken complies with internal policies and external regulations. This step transforms the decommissioning from a series of tasks into a legally defensible and auditable event, providing irrefutable proof of due diligence and securing the organization against future legal or compliance challenges.
Why It's the Final Step
Think of this as the official record that closes the loop on the server's lifecycle. Without it, you have no proof that data was securely erased, that hardware was disposed of responsibly, or that regulatory mandates were met. For a healthcare provider in Metro Atlanta, this documentation is the evidence that HIPAA's strict media sanitization rules were followed. For a local financial firm, it demonstrates adherence to the NIST Cybersecurity Framework regarding asset retirement. This final verification and record-keeping protect the organization during an audit and provide a clear, historical account of the asset's end-of-life journey.
Implementation Examples
- Decommissioning Certificate: A formal document, often provided by an ITAD partner, that certifies the secure erasure of data and/or the physical destruction of storage media. This certificate includes serial numbers, the method of destruction, and the date, creating a clear chain of custody.
- Integrated GRC Platforms: Organizations can use Governance, Risk, and Compliance (GRC) software to track the decommissioning process. These platforms create auditable workflows, capturing approvals, timestamps, and evidence (like data erasure reports) at each stage, linking the process directly to specific regulations like GDPR or PCI DSS.
Actionable Tips for a Successful Audit Trail
- Create a Master Template: Develop a standardized server decommissioning form that captures all essential details: asset tags, serial numbers, data erasure method, final disposition, and sign-offs from asset owners and IT staff.
- Maintain Signed Authorizations: Keep records of all approvals, from the initial request to decommission the server to the final sign-off from the compliance or legal team.
- Document Every Step: Record timestamps and responsible personnel for each key activity, including data backup, network disconnection, data wiping, and hardware removal.
- Centralize Your Records: Store all decommissioning certificates, logs, and forms in a secure, centralized repository. Ensure these records are retained for the minimum period required by relevant regulations, which can be seven years or more.
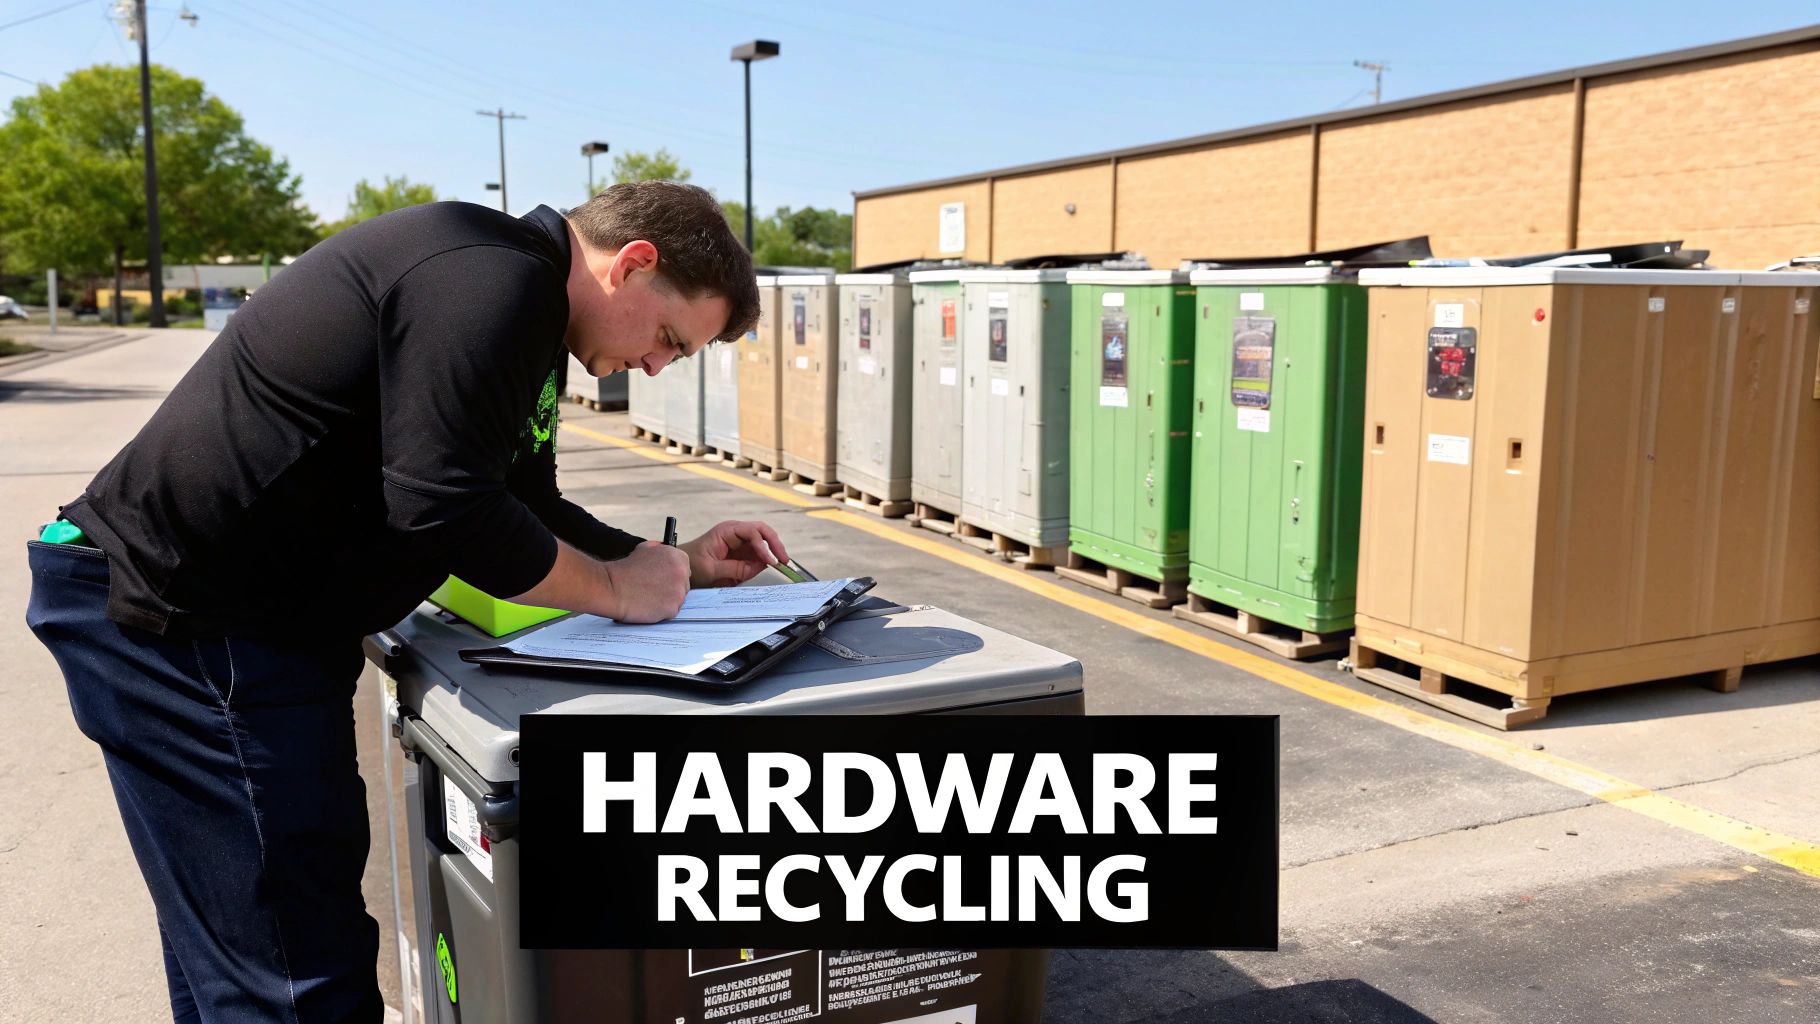
9. Hardware Disposal and Recycling
Once the server has been securely wiped and physically removed from the rack, the final step in its lifecycle is responsible disposal. This involves arranging for the physical hardware to be recycled, resold, or destroyed in an environmentally compliant and secure manner. This phase of the server decommissioning checklist is critical for meeting sustainability goals, adhering to environmental regulations, and potentially recovering residual value from the outdated assets. Proper disposal prevents hazardous e-waste from ending up in landfills and protects your organization from compliance penalties.
Why It's a Critical Final Step
Simply discarding old IT equipment is not an option. Servers contain hazardous materials like lead, mercury, and cadmium that can harm the environment. For organizations in Metro Atlanta, this means complying with Georgia's EPD regulations. Furthermore, certified disposal provides a final, auditable record that the asset has been properly handled, closing the loop on its lifecycle. It’s about corporate responsibility, environmental stewardship, and mitigating any lingering security risks associated with the physical media, even after it's been wiped.
Implementation Examples
- Certified E-Waste Recycling: Partnering with a certified e-waste recycler is the most common and responsible route. Companies like Dell Reconnect and HP Planet Partners offer take-back programs, while local Atlanta-based certified recyclers can handle bulk pickups for data centers.
- Asset Resale (ITAD): For newer or high-value components, working with IT Asset Disposition (ITAD) vendors like Arrow Electronics can help you recover value. They refurbish and resell equipment through secondary markets, providing a return on your initial investment.
- Secure Destruction: When data security is the absolute highest priority, physical destruction services from companies like Iron Mountain or Shred-it ensure that hard drives and other media are rendered completely unrecoverable through shredding or degaussing.
Actionable Tips for a Successful Disposal
- Choose Certified Partners: Always select a recycler certified with R2 (Responsible Recycling) or e-Stewards standards. These certifications guarantee they follow strict environmental and data security protocols. You can learn more about what happens to recycled electronics.
- Obtain a Certificate of Destruction/Recycling: This document is your proof of compliance. It should detail the items processed, the methods used, and the date of service. Keep this with your decommissioning records for audit purposes.
- Evaluate Resale vs. Destruction: Before defaulting to destruction, assess the market value of the server components. Even if the server is old, parts like RAM, CPUs, or power supplies may still have value.
- Plan Logistics in Advance: Coordinate pickup schedules, document the chain of custody, and ensure your team knows the procedures for handing off the assets to the disposal vendor. Beyond just servers, implementing robust decommissioning practices also contributes to broader sustainability goals, such as learning how to reduce electronic waste effectively.
10. Final Verification, Sign-Off, and Closure Documentation
The final step in a compliant server decommissioning checklist is not the physical removal of the hardware, but the formal closure of the process through documentation and sign-off. This critical stage acts as the official record that all preceding steps were completed correctly, from data backup to secure disposal. It establishes accountability, provides a complete audit trail for compliance purposes, and formally removes the asset from all operational systems, preventing future administrative errors.
Why It's the Final Step
Think of this as closing the books on the server's lifecycle. Without this formal closure, the server might remain a "ghost" in your systems, appearing in monitoring dashboards, asset inventories, and security scans, creating noise and potential vulnerabilities. For government agencies in Metro Atlanta, this final sign-off is a non-negotiable requirement for demonstrating compliance with asset management regulations. It provides a definitive endpoint to the project, ensuring all stakeholders agree that the work is complete and meets all business and technical requirements.
Implementation Examples
- Enterprise CMDB Updates: A Fortune 500 company would follow its ITIL-based change management process. The final step involves a technician updating the Configuration Management Database (CMDB) to change the server's status from "active" to "decommissioned" or "disposed," which is then reviewed and approved by a change manager.
- PMO Project Closure: For decommissioning projects managed by a Project Management Office (PMO), this step involves completing a formal project closure report. This document summarizes the project's outcomes, confirms objectives were met, and includes sign-offs from the project sponsor and key business unit leaders.
Actionable Tips for a Successful Closure
- Verify, Then Sign: Before seeking any signatures, conduct a final review of the entire server decommissioning checklist. Confirm that every task has a corresponding piece of documentation, such as backup verification logs and data destruction certificates.
- Update All Systems: Remove the server's record from every relevant IT system. This includes your asset management database, monitoring tools (like Nagios or SolarWinds), security software, and any disaster recovery plans.
- Centralize and Archive: Consolidate all documentation related to the decommissioning into a single project folder. This includes initial requests, backup logs, the Certificate of Destruction, and final sign-off sheets. Store this folder in a secure, accessible long-term archive.
- Document Lessons Learned: Hold a brief post-mortem meeting to discuss what went well and what could be improved. Documenting these lessons learned helps refine your decommissioning process for future projects.
10-Point Server Decommissioning Checklist Comparison
| Task | 🔄 Implementation Complexity | ⚡ Resource Requirements | ⭐ Expected Outcomes | 📊 Ideal Use Cases | 💡 Key Advantages |
|---|---|---|---|---|---|
| Data Backup and Archival | Medium — full data capture, validation workflows | High — storage capacity, backup software, bandwidth, time | ⭐⭐⭐ Preserved data integrity, retrievability, regulatory compliance | Regulated orgs; pre-decommissioning; long-term retention | Ensures no data loss; enables audits and recovery |
| Data Sanitization and Secure Deletion | High — multi-pass/physical processes and audits | Medium–High — certified tools/services, forensic verification | ⭐⭐⭐ Irrecoverable data; auditable destruction evidence | Disposal, resale, or transfer of storage with sensitive data | Eliminates recovery risk; supports legal/compliance needs |
| Service Migration and Transition Planning | High — dependency mapping, rollback planning | High — migration tools, testing environments, cross-team effort | ⭐⭐⭐ Business continuity with minimal downtime | Migrating critical apps to cloud or new infra | Minimizes disruption; allows controlled testing and optimization |
| License and Software Deactivation | Medium — inventorying and vendor coordination | Low–Medium — SAM tools, vendor support, admin time | ⭐⭐ Prevents license violations; enables reallocation | Reclaiming licenses at EOL; SaaS/subscription cancellations | Reduces costs and legal exposure; enables reuse of licenses |
| Disconnection of Network and External Connections | Medium — careful coordination and documentation | Low–Medium — physical access, network mapping tools | ⭐⭐ Eliminates orphaned network access; reduces attack surface | Physical decommissioning; network port reclamation | Prevents accidental access; simplifies network management |
| Physical Inventory and Asset Documentation | Medium — manual recording and verification | Low–Medium — asset management tools, staff time | ⭐⭐ Accurate asset records for accounting, resale, warranty | Audits, resale, warranty claims, CMDB updates | Enables tracking, financial records, and resale preparation |
| System Configuration and Access Credential Removal | High — must time with migration to avoid outages | Low–Medium — credential managers, audit logging | ⭐⭐⭐ Removes exposed credentials; prevents lateral compromise | Any decommission with privileged access or API keys | Mitigates credential-related breaches; preserves downstream security |
| Compliance Verification and Audit Trail Documentation | Medium–High — regulatory mapping and documentation | Medium — legal/compliance resources, audit tools | ⭐⭐⭐ Audit-ready records and legal protection | Regulated industries (HIPAA, GDPR, PCI) and formal audits | Demonstrates compliance; reduces regulatory penalty risk |
| Hardware Disposal and Recycling | Low–Medium — logistics and vendor selection | Medium — certified recyclers, transport and fees | ⭐⭐ Environmentally compliant disposal; possible value recovery | End-of-life hardware, e-waste handling, donations | Responsible disposal; potential tax/ resale benefits |
| Final Verification, Sign-Off, and Closure Documentation | Medium — stakeholder sign-offs and archive prep | Low — documentation systems, stakeholder time | ⭐⭐⭐ Formal closure, accountability, lessons learned record | All decommission projects as final step | Ensures completeness; provides evidence and process improvements |
Partnering for a Seamless and Secure Server Retirement
Navigating the end-of-life for a server is far more than simply unplugging a machine. As we have detailed throughout this guide, it is a complex, multi-stage process where a single misstep can lead to catastrophic data breaches, non-compliance penalties, and significant financial loss. A robust server decommissioning checklist is not just an IT best practice; it is a fundamental component of your organization's risk management and data governance strategy. From the initial stages of service migration and data archival to the final, documented steps of hardware disposal and compliance verification, each item on the checklist plays a critical role in protecting your organization's most valuable assets.
For businesses and institutions across Metro Atlanta, the stakes are exceptionally high. Whether you are a healthcare provider in Marietta safeguarding patient health information (PHI), a financial services firm in Buckhead protecting sensitive client data, or a public sector agency in Decatur managing classified information, the consequences of improper decommissioning are severe. This process demands a level of precision and expertise that often extends beyond the daily operational capacity of internal IT teams.
From Checklist to Action: The Path to Secure ITAD
The true value of a comprehensive server decommissioning checklist is realized when it is transformed from a static document into a dynamic, repeatable, and auditable process. This requires a commitment to meticulous execution at every phase.
- Data Security as the North Star: The absolute, non-negotiable priority is data destruction. Steps like secure data sanitization using DoD 5220.22-M standards are not optional. They are the bedrock of a secure retirement process, ensuring that no residual data can ever be recovered from retired drives.
- Compliance as a Mandate: Adherence to regulations like HIPAA, SOX, and GDPR is not a "check-the-box" activity. It demands an unbroken chain of custody and a detailed audit trail, from documenting asset tags and serial numbers to receiving certificates of data destruction and responsible recycling.
- Operational Efficiency: A well-managed decommissioning process prevents operational disruptions. Proactive service migration, license deactivation, and careful network disconnection ensure that the retirement of one asset does not create a cascade of problems for your live production environment.
- Environmental Responsibility: The final disposition of hardware is a reflection of your corporate values. Partnering with an R2 certified recycler ensures that toxic e-waste is diverted from landfills and that valuable materials are recovered and repurposed, fulfilling your organization's environmental stewardship goals.
Mastering this process is not merely about avoiding negative outcomes. It is about building a secure, efficient, and responsible IT infrastructure from cradle to grave. It reinforces stakeholder trust, protects your brand's reputation, and allows your IT team to focus on strategic initiatives that drive growth, rather than getting bogged down in the complex logistics of IT asset disposition (ITAD).
Key Takeaway: A server decommissioning checklist is your roadmap to security and compliance. However, the journey requires a skilled and certified guide. The complexity and risk involved often make partnering with a specialized ITAD provider the most strategic and cost-effective choice.
Ultimately, the goal is to achieve a seamless transition where retired assets are handled with the same level of security and diligence as your most critical live systems. By embracing a structured approach and recognizing when to bring in expert assistance, you can transform a potentially high-risk project into a streamlined, secure, and successful conclusion to your hardware's lifecycle.
Ready to implement a secure and compliant server decommissioning process without overburdening your internal team? Montclair Crew Recycling specializes in providing comprehensive ITAD services for Metro Atlanta organizations, handling everything from on-site data destruction and hardware removal to certified, eco-friendly recycling. Visit Montclair Crew Recycling to see how our expertise can simplify your next server retirement project.